Nest thermostats can help you save energy and keep you comfortable by creating a temperature schedule for you. You can make adjustments to any schedule your Nest thermostat makes for you, or if you prefer, you can create your own from scratch.
With Auto-Schedule, all Nest thermostats can learn about your home and your habits to automatically create a personalized schedule.
If you have a Nest Thermostat E, it starts with a pre-programmed schedule and your thermostat will then incorporate patterns of change based on the adjustments you make after setup.
How Nest thermostats are different from programmable thermostats
Programmable thermostats will simply continue cycling through their schedule even if nobody’s home. Nest thermostats can prevent this waste by automatically detecting when everyone’s gone, using Home/Away Assist. When no one’s home, your Nest thermostat will set itself to your Eco Temperature to help save energy.
Nest thermostats use their unique Nest Sense and Auto-Schedule features to create a dynamic, comfortable schedule that’s personalized for you and your home.
Learn about Auto-Schedule
All Nest thermostats have Auto-Schedule, and it’s turned on by default when you install your thermostat to help keep you comfortable and help save energy.
With Auto-Schedule, you don't have to manually program your thermostat to save energy. Simply change the temperature to get comfortable whenever you like with the Nest app or on the thermostat itself, and it will learn from your preferences. After a few days, it will program a schedule for you, based on what temperatures you prefer and when you want them.
For Nest Thermostat E customers, you’ll have a pre-programmed schedule out of the box. As you make temperature adjustments, your thermostat will learn from your preferences over time and update your schedule.
For more details, see the following article:
Learn about the Nest Thermostat E's Basic Schedule
The Nest Thermostat E starts with a pre-programmed schedule as soon as you’ve finished installation, so that it’s ready to use right away. You won’t need to do anything else after setup.
The Basic Schedule is based on efficient regional schedule preferences that balance energy-savings and comfort.
How to make changes to the Basic Schedule
If you ever want to change the temperature or the times in your thermostat’s Basic Schedule, you can easily change them with the Nest app or on your thermostat itself. See the section below for complete instructions.
How to change your thermostat's temperature schedule
Nest thermostat schedules follow two simple rules:
- Target temperatures can be set on the hour or at 15-minute intervals -- like at 7:00, 3:30, or 12:45.
- Adjacent temperatures must be at least 60 minutes apart.
You can view and edit your current heating schedule on your Nest thermostat or with the Nest app.
With the Nest app
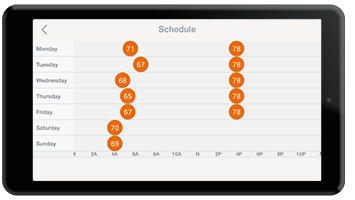
To see your thermostat’s schedule from the app follow these steps:
1. Tap the thermostat with the schedule you would like to change.
2. Tap Schedule 
How to add a new temperature to your schedule
While viewing your thermostat’s schedule,
1. Tap the day of the week that you want to add a new temperature.
2. Tap the Add button at the bottom right of your Schedule.
3. Tap on the grid to add a new temperature.
4. You can drag it left and right to change the time. Drag it up or down to adjust the temperature.
How to change an existing temperature
While viewing your thermostat’s schedule,
1. Tap the day of the week that has the temperature you’d like to change.
2. Tap and hold on the temperature you’d like to change.
3. Drag it up and down to make it warmer or cooler.
4. Drag it left or right to change the time.
How to remove a temperature
While viewing your thermostat’s schedule,
1. Tap the day of the week that has the temperature you’d like to remove.
2. Tap the Remove button at the bottom right of your Schedule.
3. Tap the temperature you want to remove from your schedule.
With your thermostat
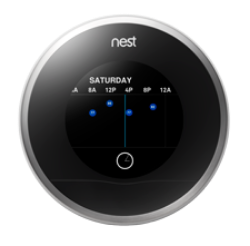
To see your thermostat’s schedule on the thermostat itself:
1. Press your thermostat’s ring to open the Quick View menu.
2. Select Schedule 
Note: If you have a Nest Thermostat E, go to Settings
Schedule
3. Turn the ring to move through the schedule. As you move through, the vertical line shows you the day and time you’re focusing on. It’s a bit like a mouse cursor for your computer. Scroll to the day and time that you would like to add the new temperature. You can see the current time at the bottom.
How to add a new temperature to your schedule
1. Press the ring and select New.
2. Turn the ring to adjust the time of the new temperature and press the ring.
3. Turn the ring again to select the temperature you want.
Tip: Look for the Nest Leaf 
How to change or remove a temperature
1. Turn the ring to move through the schedule. Highlight the temperature you want to change by moving until the center line is over it. Press the ring.
2. Select Change from the options to adjust it.
- Turn the ring to move it left and right, adjusting the temperature time. Press the ring when done.
- Turn the ring now to move it up and down, adjusting the temperature. Press the ring when done.
Tip: Look for the Nest Leaf
3. Select Remove from the options to completely remove the temperature from your schedule. Press the ring to confirm.
4. Once you’re done editing your schedule, keep turning the ring all the way to the right or the left to select Done and go back to the main menu.
How to turn off Auto-Schedule
In the first few days after you install it, your Nest thermostat will learn what temperatures you like and when you want them. It will automatically create a temperature schedule for you. If you don’t want to use this feature and program your own schedule, you can turn off Auto-Schedule on the thermostat. See the following article for full instructions:
How to use your Nest thermostat as a traditional programmable thermostat
How to change your domestic hot water schedule
With the Nest app or on your Nest thermostat you can change your hot water schedule, boost hot water on demand, turn your hot water schedule on or off, and more. The settings available to you on your Nest thermostat and with the Nest app will depend on whether you have a combi boiler or system boiler and whether it’s OpenTherm compatible or not.
For example, for Nest Thermostat E, you may only control the hot water temperature if you have an OpenTherm combi boiler, but won’t be able to control other hot water settings.
Learn about domestic hot water control for Nest thermostats and how to change settings >